
 In the sublimation process, the solid or liquid ink is converted into a gas and then back to a solid form and thus becomes the part of that substrate resulting in an increase in its longevity.
As compared to heat transfer paper and DTF printing, this method is not only cheaper but also way more durable.
If we talk about garments, the sublimation process isn’t flexible by nature and only works with Polyester, Silk and Interlocked fabrics.
Whereas, printing using heat-transfer paper is suitable for all sorts of fabrics (including Blend, Cotton, Silk, Polyester and others ) and proves to be much more convenient.
However, there is no doubt that in quality — sublimation is far ahead than heat transfer paper.
You can see and feel the boxed type layer of printed design by the touch of your hands.
Heat transfer paper prints on top of the fabric and doesn’t allow the ink to be a part of the article.
Moreover, the design cannot withstand for long and start fading and cracking with 2 to 3 washes.
For those of you who are interested in DIY dye sublimation as a hobbyist and want to sublimate their Coffee Mugs and Tumblers,
We are going to provide you with one of the best guides in this article.
Sublimation of a Tumbler
For non-fabric items such as Ceramic Mugs, Metal Tumblers; Glass and Ceramic Tiles; UNISUB products and FR-Plastic — dye sublimation process is considered as one of the best choices.
The sublimation of a tumbler includes the following steps:
- Gathering Required Items
- Assembling the Items
- Performing the Sublimation
- Unwrapping the finished Product
Now let’s discuss how to perform the above steps one-by-one?.
-
Gathering Required Items
Here is the list of items necessary to perform this process:
- A tumbler (which is to be sublimated)
- Sublimation paper ( on which the design will be printed initially)
- Sublimation Printer ( Prints design on the Sublimation Paper)
- Dye Sublimation Ink (Make sure your printer contains enough)
- Computer (With installed Printer’s Software)
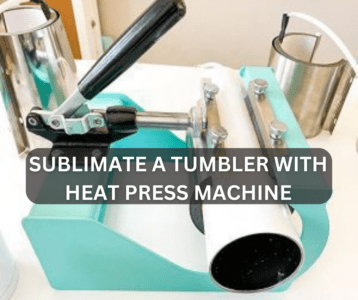
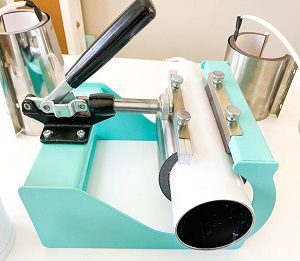
- Tumbler Heat Press Machine ( To Heat Press the Tumbler)
- Lint Roller ( Used for cleaning the tumbler before Sublimation)
- Some Alcohol ( Applied for removing any sort of oil from the tumbler)
- Clean Piece of Cloth ( for rubbing alcohol on the surface of the tumbler)
- Measuring tape ( can be used to find tumbler’s dimensions)
- Heat Resistant Tape ( to stick the sublimation and silicon papers)
- Silicon Paper ( is used to wrap over the sublimation paper)
It is important to note that if you wanna use a convection oven instead of a tumbler heat press machine then you’ll need a subli-shrink wrapper as well.
And heat resistant gloves to protect your hands from burns.
2) Assembling the Items
Assemble all items as mentioned in the steps below:
- Measure the height / length and diameter of the tumbler with measuring tape
- Now set your design parameters on the computer using the printer’s software according to the measurements of the tumbler taken earlier
- Print the designed illustration on the sublimation paper
- If sublimation paper is larger than the designed area then you can cut and remove the edges of the sublimation paper using a cutter so that there is only the printed paper area remain behind
- Put the tumbler inside the tumbler heat press machine (without turning on the heaters ) and adjust the grasp according to the diameter of the tumbler for the finest grip.
3) Performing the Sublimation
The main part of the sublimation process begins now and from now on you’ll have to be very careful while performing the steps listed below:
- Rub the Lint roller on the surface of the tumbler to clean it nicely
- If you feel any kind of oiliness on the surface of the tumbler then dip the piece of cloth into the alcohol and rub it on the tumbler
- Wrap the sublimation paper ( which we prepared earlier ) and apply some heat resistant tape on the seam to tightly wrap the sublimation paper
- Wrap a silicon paper around the tumbler over the sublimation paper to ensure minimum ink loss
- Turn on the tumbler heat press machine and set temperature on 375 ℉ or 190.556 ℃ and time at 50 seconds
- The medium pressure for a tumbler is considered 40 PSI ( Pounds per Square Inch) so adjust it by rotating the knob or check it from the gauge
- Put on your heat resistant gloves
- Place the wrapped tumbler inside the tumbler heat press machine and press the handle.
- After 50 seconds machine will give you a beep alarm
- Open the handle and rotate the tumbler at 180 degree and then close the handle for next 50 seconds
4) Unwrapping the Finished Product
Don’t touch the tumbler after just pulling it out of the machine with bare hands.
It’s time to unwrap the tumbler step by step:
- Remove the heat resistant tapes carefully
- Unwrap the silicon paper
- Remove the tapes from the seam of the sublimation paper
- Unwrap the sublimation paper in just one go
- Keep the tumbler on the table for 30 seconds to let it cool
- Put the tumbler inside the water bucket so that water goes inside the tumbler and sinks it completely
- Let it remain inside the water for 60 seconds
- Pull the tumbler out of the water and that’s it
You can repeat the same process with a ceramic mug or ceramic tumbler as well.
Final Thoughts
The process of sublimating a tumbler is not as complex as you think.
Anyone with a little sense to operate a heat-press machine and with the right instruction ( as provided in this article) can do this job himself.
However, you still need a little practice (sublimate 4 to 5 different items ) to master this art.

I’m Henry Collins and living my happy life. I’m a professional businessman and I own and run 6 Heat Pressing Services stores where I provide my clients with custom Designs on hats, mugs, T-Shirts and a lot more using Heat Press Machine. Been using a heat press for the last 4 years and people love my work. As I’ve got enough information on Heat Press I decided to make a blog on it and share my knowledge with the world. I hope, the world will appreciate it.