And then you had planned to take off the printing business to the new horizon from day one?
It is not a wise move to keep adding the different heat press machines one by one after observing the demand,
And that keeps on multiplying the cost plus the unbearable ordeal.
You can certainly pay one-time and get the overall set of complete heat press machines with all the presses you would need to cope with the demand.
Out of many multi-functional heat press machines,
8 in 1 seems a good pick providing you a variety of presses to run a multi-purpose printing business under one roof!
Still, how to use 8 in 1 heat press machine sounds like a task but in reality, it is not. It is pretty simple to use this piece-of-convenience!
What Comes with an 8 in 1 Heat Press Machine
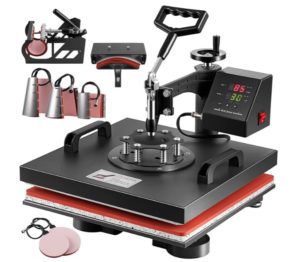
The 8 in 1 heat press machine holds the following;
- The main heat press unit with a large heat pressboard
- A hat press pad
- 4 mug presses
- 2 plate presses
How to Use 8 in 1 Heat Press Machine
Using 8 in 1 heat press machine is just easy. There are no complexities you have to ever go through.
Setting up the Main Flat Heating Plate For Pressing Shirts and Other Fabrics
- The main heat pressboard includes the digital meter on the top.
- Now bring the lower plate and fix it to the machine holder.
- Get the upper heat platen and place it over the lower plate
- Lower down the clamp, lower the presser to reach the surface of the upper heat platen, tighten the screws with adequate pressure and only with your bare hands so that the heat platen does not come off as you raise the clamp
- Connect the plug coming from the upper heat platen to the control box
- Now your heat press for the shirt and other fabrics are ready to use
Setting up Plate Press
The package includes two units of plate presses.
- Remove the upper flat heat platen by unscrewing the screws with your hand
- Take away the upper flat heat platen to the side
- Place the plate pressure and hook it to the main presser by tightening the screws with your hands
- Plug the cable coming from the plate presser to the control box
- Lower the clamp and see if the pressure is good
- After all of that, the plate presser is good to go!
You get a total of two plate presses which will take about the same procedure to attach.
Setting up Hat Press
Now it is time to use the hat press machine to imprint the interesting designs on the hats. And you get one hat press with the purchase.
- Lift the lower plate and put it on the side
- Insert a screw into the machine holder and place the hat press
- Place the second screw on the other side of the hat press and tighten them up
- Put the upper hat plate, lower the presser, and hook by tightening the screws
- Plug its cable into the control box
- Adjust the presser accordingly
- If all set, then you are ready to use the hat press
Setting up Mug Press
The mug press comes with a separate machine and is super easy to attach to the control box.
The 8 in 1 heat press machine often comes with over four mug presses to attach with the mug press machine.
- Get your required mug press into the mug holder by tightening four screws with your hands
- Place the mug between the presser and check its pressure (and adjust accordingly)
- Plug the cable with the main control box, and now your machine is ready to heat press mugs
What Steps to Take after Attaching All the Presses
Whether you have a hat press, plate press, mug press, or the main flat heat press attached,
What to do next is to go with the heat pressing the design transfers on substrates.
After you have plugged in the cable with the control box, go with the following;
-
- Preheat the heat press machine to the recommended temperature depending on the stuff to press
- Then select the timer accordingly
- Press down the clamp and start the counter to let the machine start pressing
- Wait for the beep indicating the heat press has been completed (will beep after the timer runs to 0 and most of the heat press machines support this beeping functionality)
- Open the presser handle, let it cool down, peel away the wrap from HTV, and here you have your design imprinted!
Conclusion!
You cannot thank yourself enough for owning an 8 in 1 heat press machine!
It is simply the boost that you will acknowledge after having this complete machine at your end!
And then you are not going to hit a wall because of knowing everything about how to use 8 in 1 heat press machine.
Just that focus over if you have good demand to purchase this beast from day one.
You analyze the demand, you find the demand, then you are not going to live with the ‘no-orders for today’ thing!

I’m Henry Collins and living my happy life. I’m a professional businessman and I own and run 6 Heat Pressing Services stores where I provide my clients with custom Designs on hats, mugs, T-Shirts and a lot more using Heat Press Machine. Been using a heat press for the last 4 years and people love my work. As I’ve got enough information on Heat Press I decided to make a blog on it and share my knowledge with the world. I hope, the world will appreciate it.

