

 Creating vivid designs with a Fancierstudio heat press sounds like a dream of every printer. With this advanced machine, bringing vibrant designs to life is like a piece of cake. However, misprints and flakiness are huge downsides that keep a person away from trying to achieve their dream.
Good for you, by following just a couple of guidelines, you can easily steer clear of misprints, flakiness, and all other printing problems that often arise with printing via a Fancierstudio heat press. In order for that to happen, you need to understand the machine inside out and know how it works properly.
Once you have understood the entire process, striking results with vivid colors will be just a couple of steps away. I have jotted down the entire procedure in layman’s terms, so even learners can get the hang of this machine quickly.
How To Use Fancierstudio Heat Press
The procedure below will help you use your Fancierstudio heat press easily and create vivid designs with it.
Adjust The Settings
Take your Fancierstudio heat press out of its package and turn the machine on. Whilst it comes to life, you need to take a closer look at the small box that is present in the upper left corner of the machine. This small box holds way too much importance, as it houses the temperature and the time settings. The top screen displays the temperature in red, and the bottom one shows you the time in green color.
Once the machine has powered on, you can adjust both settings, taking the aid of the arrow keys that are present near the bottom of the control panel. The temperature setting has its own control keys, and the time can be controlled and altered with its own control keys. Modify both settings while keeping your project’s requirements in mind. What sets the Fancierstudio heat press apart from the rest is the presence of a third vital control, i.e., pressure. The pressure knob is located at the back, in red color.
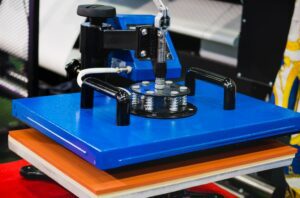
Exposing The Base Plate
The base plate of a Fancierstudio heat press is quite wide, so it can be used for printing wider designs. In order to expose the base plate, you need to lift the top upwards with the help of the handle. Once the base plate is out in the open, you can place your shirt or the garment that you want to print. However, an important thing to keep in mind here is that, when you turn the heat press on, do not start printing immediately. Let the machine sit idly and heat up for approximately 30 to 45 minutes. After this duration, the machine will be ready for printing.
Setting Up The Garment
Whether you are printing a hoodie or a cape, take that fabric, and place it carefully on the base plate. An important thing to consider here is that you need to ensure that the fabric is placed in a straight line, and does not have any creases. Ironing the garment before printing is a good way to eliminate all the creases.
Transferring The Design
The ideal way of using a Fancierstudio heat press is by doing three presses. The first press is to prepare the fabric, the second press is to transfer the design, and the third press uses a Teflon sheet, which seals the design so that it does not chip away.
First Press
In the first press, not only do you prepare the fabric and set up your canvas, but you also adjust the pressure of the heat press. Shut the heat press by pushing the top plate down. You can push through the handle, and apply force to lock the top plate. If the pressure does not seem okay, then you can easily increase it through the pressure knob. Once the pressure has been adjusted to your liking, lift the top plate upwards.
Second Press
Once your canvas i.e., the fabric is ready, take the design that you wish to transfer onto the garment and place it carefully on your garment. You can use a sublimation printed image, or instead of sublimation paper, you can also use heat transfer sheets that have the design imprinted on one side, and adhesive on the other side.
After placing the printed image on the fabric in your desired location, you can keep it in its place with the help of heat-resistant tape, if you are using a sublimation printed image. Push the top plate downwards again, and apply force till it locks, and you hear a clicking sound. Hold the top plate in its place till the timer goes off. Immediately lift the top plate once the timer rings, wait for a few seconds, and then peel the print away from the garment.
Third Press
The third press requires a Teflon sheet, which is placed right on top of the garment where the print is. Cover the design completely, and then push the top plate down again. The third press is done only for 4 to 5 seconds. After the time is up, lift the top plate again, and voila! A beautiful print occupies the space on the garment that was empty earlier. This is all you have to do, to create your own line of clothing with the Fancierstudio heat press.
Conclusion
When you have a Fancierstudio heat press available at your table, you can not let your fear of failure stop you from designing your own clothes. The step-by-step guide above describes the entire process of using a Fancierstudio heat press in detail.

I’m Henry Collins and living my happy life. I’m a professional businessman and I own and run 6 Heat Pressing Services stores where I provide my clients with custom Designs on hats, mugs, T-Shirts and a lot more using Heat Press Machine. Been using a heat press for the last 4 years and people love my work. As I’ve got enough information on Heat Press I decided to make a blog on it and share my knowledge with the world. I hope, the world will appreciate it.