
Are you looking for a way to make sure your projects have the perfect amount of pressure when using a swing-away heat press? If so, then you’ve come to the right place. This article will provide an easy step-by-step guide on how to adjust pressure on swing away heat press whether you’re a professional printmaker or just starting out with DIY t-shirts.
Heat pressing is a popular method of transferring designs and images onto various materials. It involves the use of heat and pressure to create a permanent transfer. Adjusting the pressure on a swing-away heat press is important in achieving optimal results.
The right amount of pressure is essential for a successful print and can vary depending on the type of material and size of the design. To ensure maximum efficiency, it is essential to understand the importance of adjusting pressure on a swing-away heat press.
Let’s get started.
How To Adjust Pressure On Swing Away Heat Press
Adjusting the pressure on your swing-away heat press is essential to make sure you get the desired results. Here are the steps to follow:
Step 1: Identify Pressure Settings
When learning how to adjust pressure on swing away heat press, the first step is identifying the pressure settings. It includes understanding what type of material is being used and its thickness. Knowing the correct pressure setting for a particular item will ensure that it is printed correctly onto the fabric.
It’s important to pay attention when selecting a specific setting because an incorrect selection can damage or cause fabric imprinting errors. To make sure that you get accurate results, it’s always best to measure carefully before making any adjustments to your heat press machine.
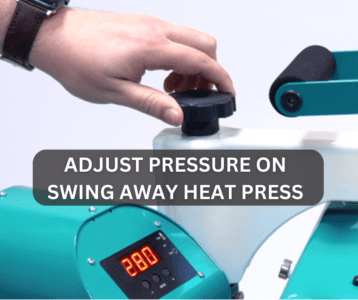
Step 2: Adjust Pressure Knob
Adjusting the Pressure Knob is critical to successfully using a swing-away heat press. To adjust the pressure on your heat-press, start by rotating the knob clockwise until you reach the desired pressure level for your project material. It is important to understand that not all projects require the same pressure, so adjusting accordingly is essential.
In order to achieve an even and consistent pressing surface, ensure you consistently readjust your knob as needed throughout the project. It is also important to note that too much pressure can damage some materials or create an inadequate design due to over-pressing certain areas.
Step 3: Set Optimal Heat Temperature
The third step in adjusting the pressure on a swing-away heat press is setting the optimal heat temperature. Heat presses work by applying uniform and consistent pressure to a finished product, so setting the temperature before beginning any project is important.
The right temperature helps ensure that your design or print will turn out correctly. To find the perfect temperature for your project, start by consulting the instructions with your heat press machine, as different types of projects require different temperatures.
Step 4: Monitor Time & Temperature
This step is critical in order to ensure that the heat press is working properly and that you are achieving accurate results. Time and temperature must be monitored frequently during a pressing job in order to guarantee the best possible outcome.
A timer should be used to track how long each piece has been pressed to accurately monitor time and temperature. It’s important to not exceed the recommended amount of time specified by the fabric manufacturer since this could lead to damage or discoloration of your fabrics.
Step 5: Test Print on Fabric
Step 5 is vital in making sure that all of the previous adjustments have been made correctly and are giving you the desired results. To do this, choose a piece of fabric similar to the material you will be using for your project and place it into the heat press.
Make sure to make any necessary adjustments before closing the press. Once closed, run through a few test prints with different pressure settings to determine which gives you the best results. When done correctly, this step can help ensure that your projects come out looking as good as possible.
Factors to Consider
When adjusting the pressure on a swing-away heat press for different materials, there are several factors to consider:
- Thicker materials may require more pressure to ensure proper adhesion of the design or transfer.
- Materials with many stretches, such as spandex or Lycra, may require less pressure to avoid distorting the design.
- Some materials, such as nylon or polyester, may require lower temperatures and less pressure to avoid scorching or melting.
- Materials with a glossy or smooth finish may require more pressure to ensure the design or transfer adheres properly.
- Heavier materials may require more pressure to apply properly for the design or transfer.
It’s important to test the pressure settings on scrap materials before applying them to your final project to ensure the best results. Always follow the manufacturer’s recommendations for the specific heat press and material being used.
Troubleshooting Tips
Troubleshooting any type of machinery can be a difficult task. It requires patience, knowledge, and trial-and-error efforts to get the job done correctly. When you’re dealing with a swing-away heat press, there are several tips that can help make troubleshooting the machine easier and more efficient.
-
- Check the pressure setting on the heat press and ensure it is set to the appropriate level for the project you are working on.
- Make sure the heat press is properly calibrated and maintained.
- Experiment with different pressure settings and test on scrap fabric before applying it to your final project.
- Check the temperature setting and ensure it is set to the appropriate level for the type of material you are working with.
- Consider using a heat press pillow or another pressure-applying tool to help distribute pressure evenly.
- Clean and maintain the heat press regularly to ensure it is functioning properly.
- If the issue persists, consult the manufacturer’s manual or contact the manufacturer for assistance.
Conclusion
In conclusion, adjusting the pressure on a swing-away heat press is an important step in ensuring successful transfers on textiles. Properly setting the pressure can ensure clear and crisp images while reducing the risk of damaging both the print and fabric. By following the above simple steps, you can safely adjust your machine’s settings to achieve optimal results.
I hope you enjoyed my article on how to adjust pressure on swing away heat press. If you have any questions or comments, please leave them below.

I’m Henry Collins and living my happy life. I’m a professional businessman and I own and run 6 Heat Pressing Services stores where I provide my clients with custom Designs on hats, mugs, T-Shirts and a lot more using Heat Press Machine. Been using a heat press for the last 4 years and people love my work. As I’ve got enough information on Heat Press I decided to make a blog on it and share my knowledge with the world. I hope, the world will appreciate it.